General info
& ideas
Mirrors
....(various
sizes, from large to tiny)
Large & Medium
frames ...techniques, examples
Small
frames esp. for ornaments
.....twisted & flattened
Very
Small frames --for pins and pendants
Decorative
tiles (various sizes)
....some techniques, appearance
....uses &
ideas
........single tiles .....grouped
tiles
....making, baking, attaching
....more tiles at GlassAttic
Tri-fold panels, triptychs
Displays
for pieces
FRAMES, Mirrors, & TILES
GENERAL info & Ideas
Frames can be made for photographs, clay scenes, even small items like jewelry . . .or for anything you want to frame
...they
can be made totally from clay ...or clay can be used to
"cover" bought or made wood or metal frames, cardboard
frame shapes/matt board frames/etc., or just about anything else
that can go into a 275 degree oven.
...frames themselves or frame
embellishments can also be made and baked, then later glued onto
a frame (acrylic or any kind)
......Mary W's painted flat frames have a flat
square of clay topped with a large rounded flattish bead glued
onto each corner (beads are caned mostly)
...there are
some special considerations for covering wood, and for general guidelines
on covering any material, see Covering
...We buy
the painted wood frames at the dollar store then sand them down to
the wood.. Nan (though if it's acrylic paint, it'll work even better)
Frames
can be created in other ways:
.... by stacking a
sheet or slice or clay item on top of a slightly
larger sheet... so the wider layer underneath extends past
all sides of the smaller one on top of it, forming a natural frame
....replacement...
a shape can be cut out and removed from a sheet, then a decorative sheet of the
same shape can be dropped into the hole in the first sheet
...thinner "borders"
or wider "frames" can be added around the edge of,
or on top of the edge of the focal clay sheet
......e.g.,
ropes, rounded-edge (flattened) strips, or sharp-edge strips
of clay could be wrapped around the focal area, or pieced around
it, in various ways
.......these can be applied to all sides with one
continuous piece, or be cut into 4 pieces then butted at corners, or around
3 sides with a separate piece at top, or any combination
....... these
can also be textured and/or highlighted, or have other surface treatments
....caned border frames can be made separately, then be
joined to the focal area as part of the total cane, or added separately whenever
that frame is wanted
......any cane or row of canes can be squashed
till it's flat enough to act as a frame... patterning in the cane will
create a visually textured "frame"
For
cutting accurate shapes and exactly parallel cuts, etc., an Omnigrid
quilter's ruler is a good thing to work on ... Mary used the (back
side of the) 6 x 12" one with bright yellow lines.. . . I've been using
a sheet of graph paper stuck to the back of my
clear acrylic work surface, but this would be better in various ways.
Diane B.
...(see more gridded work surfaces in Tools
> Work Surfaces)
For rectangles and other shapes, use templates or stencils from around the house to cut around ... box lids
shrinkage
(noticeable usually only in larger, thinner
pieces of clay, or larger fit-together pieces)
....I did a piece
which was supposed to have exactly 6" square tiles. 54 of them. After the first
18 didn't fit quite perfectly in their places, I got wise!! Anyway:
... All
brands of clay can shrink..... The ratio can be from 1% to 5%.
...
but, I found it depends on the softness
-stickiness of the clay--how much plasticizer
or additional solvent
is present
....... thus, leached clay will shrink less than
fresher, softer clay
........the thickness of the sheet seems to have an inverse
relationship to shrinkage
....... so a thinner #4 or
5 sheet will shrink more than a thicker # 1 sheet... I suppose this
is some factor of resistance and "stretch -- ie. the thicker piece has more body
to resist the force of inward shrinkage.
... If what you are doing needs to
be precise, I would suggest you either do a test piece and calculate
your final cuts based on the shrinkage you find
...... Or cut your piece
slightly larger than what is needed, then trim or sand down
to fit after baking. Patti Kimle
... Someone also said their tiles didn't
shrink when sandwiched between two bathroom tiles (presumably while
baking)
... Another possibility is to create the clay sheet and bake it
alone, then "veneer" it onto the frame with glue (... it could be rebaked
after the initial baking if you needed that, without further shrinkage, I think)..
. . If the frame isn't flat, this could still be done, would just be more
fiddly and you'd want to cool the clay before removing it from the frame to bake.
(for more info on "veneering" polymer clay, see Covering
> Veneer Sheets). Diane B.
OTHER PAGES at GlassAttic
with more ideas:
...for more frame &
mirror decorating ideas, see Covering
> Switchplates
...for clocks,
see Covering > Clocks
....
and also see "Websites" sub-category below
for many frames and framing ideas
NOTE:... most all frames on this page could be made in various sizes
MIRRORS (various sizes)
Mirrors are just sheets
of glass with a reflective metal backing, so they do fine in the
oven with the clay using our low temperatures.
...however, like other
glass they can expand or contract
more quickly than the clay, so the clay
can sometimes crack
especially when it's in larger expanses which can't stretch over the glass.
. .so especially for clay "covered" mirror or glass, heat and
cool slowly to avoid that problem by letting the item cool in the oven,
and/or heating it in small increments
(...smaller mirrors and mirror
tiles may not have the problem as much)
NOTE:
The mirrors in these examples range in size from large down to 1"
or so
... many of the ideas and instructions here could be used for various
sizes of mirrors though
...the following will generally
go from the largest to the smallest mirrors
Mirrors can be basically
just framed (as one would frame a picture), or they can be partly onlaid
with clay and clay decorations as well, even to make small scenes.
I've been making mirror wall hangings
and standing mirrors.
....... I put a thin clay backing on the mirror,
and then frame it with sliced canes.
.......The mirrors are just simple old
cheap 12" mirror tiles (from hardware store) cut to
the shape and size I want.
........They do not crack or discolor with baking.
and they hold up under sanding the polyclay. They polish up beautifully.
...
My mirror was about 15 inches X 12 inches and I got it cheap at Walmart (I
think it was only about $4).
..... The mirror baked fine but the
clay kept cracking.... I think the mirror expanded more when heated than
the clay. . . At the time I didn't know to leave (mirror or glass under polymer
clay) in the oven to cool slowly... It looks great now, if I do say so
myself.
What
I do to hang mirrors (esp. larger ones which can be very heavy)
is to use a piece of telephone wire, fold it in half and twist it until
you have a tightly twisted length. ... then embed the ends into a couple
of flat pieces of clay, apply liquid clay to the clay and wire, and press
firmly onto the clay back of the item (... be sure you've turned the ends
of the wire so they don't pull out of the clay when baked). Hope this helps! Irene
NC
...Irene's larger mirrors, framed with various clay tiles (stamped,
antiqued, fauxs, etc.)
http://good-night-irene.com/mirrors/Mirrors.html
Chris Gluck's lesson on making a round frame for a
square 8" mirror, using WireForm mesh or window screen
for strength, creating holes in the clay for threading wire used to hang
it, then embellishing the frame with artistic wire and funky colors
and shapes
http://www.hgtv.com/hgtv/dc_furnishings_other/article/0,1793,HGTV_3433_1390596,00.html
Christi
Friesen uses lots of sculptural elements on her frames (leaves,
animals, scenes, squiggly bits, & mixed media embedded in the clay,
etc.)
(which often cover up most of the visiblel mirror)
http://store.cforiginals.net/mirrors.html
Crealand's
many creative frames for medium-size round mirrors (various
embellishment ideas)
... usually round mirrors... with "rays"
or other things around circumference
... one has insects crawling on
it ... the tree mirror has many branches & leaves ... one is a rainbow
and cloud
http://crealand.free.fr/miroirs.htm
Pauline's fish and underwater bas relief scene all around and on a small round mirror http://www.picturetrail.com/gallery/view?p=999&gid=529621&uid=447171(gone)
one
mostly-covered mirror with alien and stars, etc (leaving large
hole in clay outside mirror area for holding mirror?)
... and one mirror
with skull and flower onlays, by econolines r 4 girls
http://i160.photobucket.com/albums/t196/econolines/100_2194.jpg
(I
made a scene with a fairy princess sitting by a pool)
... I covered
the parts of a mirror I wanted to be grass (with green clay), and made
a shoreline with other clay
(...the mirror served as a strong base for
the entire sculpture and reflective surface for the pond).
....After all baking
was done, on the glass I used glass paints (GalleryGlass) in shades of
translucent, white and blues to make ripples and the pond color I wanted. It turned
out very well...later I also made a few lily pads and a frog to sit on them (just
white-glued those to the pond). Sharon V.
Linda WP's lesson on making
a polar bear with ice skates on mirror pond ...and a dog on a sled (made
w/ FimoSoft's "Metallic White" clay)
http://www.chasummershow.com/productsheets/dogandbear.pdf
Kimba’s mirror frames of lots of squiggly-rope onlays around and
on a mirror ("Gorkley") (could be strings from
clay gun which have been pulled from the disk rather than cut, resulting in pointed
ends for the strands; these are onlaid around in squiggles or other shapes)
http://hobbystage.net/art/kimba/gorkley
(gone)
purplepapillon's
clay frame-and-hanger combination on a mirror made with continuous
revolutions of clay rope onlaid (little like Balinese Filigree) (part of which
opens for a hanging loop at the top)... (imagestation...gone)
For smaller wall mirrors I want to cover with clay and hang, I cover the back with a sheet of clay, then embed a bent paperclip as a hanger. It is cheap and works great.
Ann & Karen Mitchells'
lesson on making an entire hand mirror with
clay (not covering an existing hand mirror)
... then adding
2x3" oval mirror .... embellishing back of finished mirror
with leaf & clay ribbon roses
http://www.hgtv.com/hgtv/cr_clay_other/article/0,1789,HGTV_3239_1396639,00.html
Susan's framed mirror http://www.geocities.com/EnchantedForest/Cottage/2780 (gone--Dinko's website!?)
The Trash
To Treasure guy had a mirror framed in pieces (of moulding)...none of
which matched but it looked great! Rebecca
pocket
mirrors
...very small round or rectangular mirrors can be covered, partly
covered, or embellished in the same ways as other mirrors (above)
...if they're
actually carried in a purse/etc, they'd need not to have projecting parts
or to have a fabric or other small slip case to fit into
....for
pocket mirrors, I don't cover the back (but just enough to go around the edges,
or glued on well to the front with epoxy glue or E-6000?)
purse mirrors
with skull and "alien" onlays by econolines are for girls
http://i160.photobucket.com/albums/t196/econolines/100_2194.jpg
http://i160.photobucket.com/albums/t196/econolines/100_0090.jpg
(front)
...more at http://s160.photobucket.com/albums/t196/econolines
the
clay around Casstasstrophie's small round mirror is shaped as a strawberry
cutout ... covered completely on the back side and over the edges of the mirror
on the front side
http://farm4.static.flickr.com/3291/2871839579_7da0350e4b.jpg?v=0
.... http://farm4.static.flickr.com/3278/2871839527_30ac42c456.jpg?v=0
many pocket mirrors with bas relief, onlays, etc on backs,
by mosfatal
http://i121.photobucket.com/albums/o233/mosfatal/100_0982.jpg
...more
at: http://s121.photobucket.com/albums/o233/mosfatal
Luinecu's
large rainbow cane slices on back of small mirror
http://i88.photobucket.com/albums/k163/luinecu2/P3310028.jpg
alphabits'
bas relief on the back side of two small mirrors (optical illusion images)
http://i226.photobucket.com/albums/dd159/alphabits_photos/faces.jpg
Balinese
filigree (half spirals) on the front of a mirror by Robotragicomedy
http://img.photobucket.com/albums/v639/Wino/grape2.jpg
...
and the front side: http://img.photobucket.com/albums/v639/Wino/grape1.jpg
mansonette's
Balinese Filigree Mickey Mouse and background mirror (back)
http://i169.photobucket.com/albums/u224/darkdollhousedesigns/Picture014.jpg
CozmicStardust's
geometric Balinese Filigree mirror backs
http://i45.photobucket.com/albums/f65/KHiggins88/Cozmic%20Stardust%20Creations/DSCN4547.jpg
Sarajane's miniature mirrors... a fancy-framed gold Victorian
wall mirror over a dresser
... and a hand mirror covered with
metallic gold
http://www.beadbabe.com/img/uploads/ItemPicture/ImageFileName/21339_1141640355_f5File_vanity%20web.jpg
Grant
Diffendaffer's very small shisha mirrors embedded in clay... OR maybe the
clay is on top of a large mirror, and it shows through where the square or circular
cut-outs are? (see also Onlay> CD shards)
http://www.nwpcg.org/ravensdale/rave/rave00/diffendaffer.shtml
shisha mirror embroidery (India), and it's basic stitch attachment
http://hsc.csu.edu.au/textiles_design/design/1_1_5/shisha.htm
round and square very small mirrors used as centers for clay snowflake
ornaments (with onlays, texturing, etc) by PolymerJanna
http://s196.photobucket.com/albums/aa118/Spencer83006/?action=view¤t=100_7325.jpg
other uses for mirror, and info:
I was thinking of covering some cosmetic
compacts myself.... Or just use a mirror (and a form) to create one from scratch?
...compact blanks... each compact is round, and gold in color.... It has
a round recess in the top that is about 1.5mm deep, to hold your clay sheet
.....each
compact has two mirrors, regular magnification & 2x ...$4.95 for 9 or fewer...each
comes in its own black box with a soft, black, drawstring pouch. Larry
http://polymerclayprojects.com/compacts.htm
...could
also glue a mirror to the inside of an Altoid tin to use as a "compact,"
etc.
What if you could glue a small mirror
onto the middle (of a CD)
and cover the outer edges with a clay scene or collage, then
hang it in a small bathroom or over a dresser
......... or possibly
add a handle and outer edges of clay and make a hand mirror. Dar
....I cut a few pieces of a CD, and stuck them into a bead, baked at
250 for 30 minutes and it worked like a charm... Came out looking like mirror
in the clay... looks great, baked up fine and the shiny CD under the translucent
clay is terrific!
(or use the CD as a frame --see
more on using CD's in Covering >
CD's and Onlays)
small bits of mirror can be used along with polymer tiles when making mosaics
wonderful trick ...put a small piece of mirror underneath a gemstone for an eye..... the mirror will reflect some light back trough the stone, which will sparkle when it moves .......they seem to be more alive
If
I want to remove the silvering or whatever it is called on the
back of antique mirrors that have been damaged, I've used toilet
bowl cleaner. Works super fast.---but do use precautions as it is not a substance
that you want in contact with skins, eyes, etc. Jeanne
..........toilet bowl
cleaners have an acid in them. Dotty CA
...I scraped the silvering off the
backs of some of those very small round mirrors except on the edges as
a substitute for small pieces of round glass... then I sandwiched
a photo with two of the glass pieces to encase it, and used copper tape to seal
around the edges. ethernaut .
...for more possibilities for decorating mirrors , see Covering > Switchplates
(for possible shrinkage when using larger, thinner and also softer clay pieces, see above under General Info)
"covering" frames of various types
Amy K's lesson on covering a purchased matte
board frame with diagonal rows of very simple canes
...she applies
a coat of white glue first & dries it to give tooth to the cardboard
surface
...after baking the whole frame, she paints the side edges and back
of frame with acrylic paint
......(or could also just paint the whole
frame everywhere first with acrylic paint, dry, then attach slices)
http://www.michaels.com/art/online/displayArticle?articleNum=as0077
(almost bottom of page)
I
found the frame at Walmart, next to the stamping stuff....seems to be made of
cardboard, but is covered with a ...gee, I don't know. it's either
cloth, or paper made to look like cloth, white in
color. cost about $4... they had 3 sizes.
...I
used tacky glue (on it), let it dry
...then I covered with a
thin sheet of plain clay and baked it. (it had a couple of bubbles
when I pulled it out, but I just pressed a book to it while it cooled) . .
. kellieAK
Purchased wood or
metal frames come in all types (molded, flat, etc.)
...these can
be covered with clay sheets or slices, etc, in various ways
...a coat of white
glue or acrylic paint (allowed to dry) must be used on bare wood in
order to help the raw clay stick while attaching you're attaching it
...metal
can be covered alone, or abraided a bit, or coated with white glue to give some
tooth if there's a problem
....one good
thing about using an existing frame is that they often already have a hanging
or standing mechnism on them
(see much more
on covering metal or wood in general in Covering
> Metal and > Wood...)
Lynne's (wood?)
frame, covered with a sheet of patterned clay ("acrylic paint
technique")... mitered corners
http://www.cgpcg.org/photos/clayathon02_lynne_demo4.jpg
Ilysa's (wood?) frame, covered with various sheets of cane slices, etc....
corners not mitered
http://www.emeraldearth.com/servlet/Categories?category=Picture+Frames
lesson on using many molded bits of clay (leaves/flowers/filigree
from a push mold, using just enough clay to fill, then pulling edges back
before removing from push mold) to embellish a white-glue-covered flat wood
frame, with rolled-up spirals of clay/etc in any spaces left between
the pieces
...... Lynne K then bakes her frame and clay, paints over all with
acrylic paint then more glue, and adds a mult-colored sheet of metallic leaf
over all... antiques with brown acrylic paint, then seals leaf with Future
(could add leaf to raw clay shapes instead of having to use white glue
size for leaf, if done carefully)
http://www.sculpey.com/Projects/projects_EasyOrnateFrame.htm
Donna Kato's lesson on covering a non-flat wood frame with
long strips of clay (then cane slices?) over a coating of dried permanent white
glue
...after baking she glues a piece of wire mesh (edges folded back first)
in the frame to hang earrings from
http://www.hgtv.com/hgtv/cr_clay_other/article/0,1789,HGTV_3239_1370872,00.html
different-shape frames.... Michaels has frames in
the different shapes -- snowmen, stars, trees, etc
....you could
also use cover various wood shapes, then create and add a slender "frame"
on top as an onlay for holding the photo on top
.....to make a Christmas
tree frame, I covered a wooden tree frame with a thin layer of clay....
then used my clay gun to extrude small ropes/strings of clay... I extruded a small
amount at a time, then scraped across the end of the clay gun with my needle tool
- which causes a group of those strings to stick to your needle tool - which you
can then apply to the frame. ...It's a little time-consuming, but very easy to
do. Ginny
....you could use a large tree-shaped cookie cutter to make
your own clay frame shape. Ginny
frame with plastic canvas
as an armature ( = rounded contour)
....cut a sheet
of plastic canvas the size & shape you want the frame to be...it should be all
in one piece, with the "window" cut out for the picture.
...roll out some
clay to about med thickness on the pasta machine.
...lay clay on
top of the canvas, butting any edges of pieces you need to join
.......the
clay doesn't need to all be the same color...try geometric shapes, skinner blends,
stripes cut with a wavy blade, etc
...use a brayer to roll the clay
firmly onto the surface of the canvas....the texture
of the canvas will probably show through but that can just be part
of the design
...trim off excess clay around edges of canvas
...(add cane
slices or whatever you want as embellishments --or bake first, and add
these later)
...place the frame clay side up in your oven and bake...
the canvas may melt slightly, but that won't
matter.
Important:
turn the frame over (clay side down) to cool.
.......as it cools, the edges will curl up, making a nicely rounded
contour for the frame. Suzanne
Lisa
P's lesson on covering the top of the lid of a photo storage
box (using epoxy for baked "flower" frames
for photos, and tacky glue
for raw clay embellishments)
http://www.hgtv.com/hgtv/crafting/article/0,1789,HGTV_3352_1399654,00.html
Valerie
Aharoni's strips of texture sheet forming an interesting
frame (around a sheet-of-pattern which was surrounded by a textured base
sheet as well)
...she used 6 long thin strips, each 1/2"
or so wide
...placed 2 of them across the top of the frame area and two across
the bottom (horizontally and a bit separated, reaching all the way across the
tin)
... the last two strips were vertical, placed a bit in from the edge of
the tin, and butted against the inner two strips)(top of an AOL CD tin?)
http://people.delphiforums.com/olrebbiepie1/tinswap_files/tinswapa.html
(gone?)
acrylic
frame with baked clay sheet glued onto it
...I'd suggest you bake the frame first, then glue it to one of those
acrylic frames
......Walmart
has tons of the acrylic frames in various sizes....some come with built-in
stands ..and some with magnets attached
......the "back"
of your frame will be the acrylic frame
......basically, you just make a
frame of clay with a hole in it... bake it.. then glue on TOP of the acrylic frame
after cooling
....... then insert the photo into the acrylic frame (since
the clay has a cutout area..you can see the photo behind in the acrylic frame).
Jan R.
..Michaels'
lesson on making a clay frame to glue onto an acrylic frame
.......3/4" strips of black clay are laid onto a paper template
(w/ drawn outline of acrylic frame)...corners mitered or butted
.......slices
of checkerboard cane are added, as well as sculpted chili peppers
......
frame baked, then attached to frame with superglue or E-6000/Goop
http://www.michaels.com/art/online/projectsheet?pid=99237
(gone)
.....Donna
Kato's lesson for acrylic frame (...one of those that's "bent"
over to form a sort of pocket for photo)
http://www.hgtv.com/hgtv/cr_clay_other/article/0,1789,HGTV_3239_1375801,00.html
.......Skinner blend with some
random floating canes for front... cut arcs in sides for interest
...... 1/16"
thick black backing sheet, cut 1/4" wider on left and right
.......
tapered thickish clay rod pressed onto 1/4" extensions & spiraled toward
outside on ends
.......baked; then glued onto front of acrylic frame;
slip photo into between acrylic sheets of frame
........to avoid
confusion in the instructions, keep these things in mind:
..........1.
after step 4 the "backing clay" is completed
..........2. in step
6, the "border clay" is the backing clay piece completed before, and
mitering refers to the perpendicular join at each of the 4 corners where
the flattened clay snakes meet
magnet "sheets"
have an adhesive back, so a layer of baked polymer clay can
just be stuck to them (don't use Sculpey...too
brittle when thin)
.....other magnets may have to strength to hold on top of
the clay as well?
...some USES: small frames for frig....
or gifts... postcards... games..mosaics...etc.)
...available
at craft(?) or office supply stores (these do
NOT go through your printer, but a printed sheet can
be pressed to the back of the magnet sheet after the release paper is removed
instead of clay instead of clay... or the clay could be glued on while something
else it stuck on to the sticky side)
Another
thing I did that was a BIG hit was a large polymer clay frame for my brother's
computer monitor
...He works by the
Monterey Bay aquarium, so I did a underwater scene, complete with fish, seaweed,
clams and the requisite sea dragon at the top!!! It …covered the ugly beige plastic
area (that frames the monitor) Syndee
(for
more on things to do to a computer, see Covering
> Plastics)
What
if you could glue a small mirror onto the middle (of a CD),
and cover the outer areas with a clay scene or collage, then hang it in a small
bathroom or over a dresser, or possibly add a handle and outer edges of clay and
make a hand mirror. Dar
(or use the CD as a frame
for a photo instead --see more on using CD's in Covering
> CD's )
all-clay frames ...(front+back)
lesson on all-clay frame (front+back)
by polymerclayexpress, with angled wire stand attached
http://www.polymerclayexpress.com/jan2002.html
...texture 2 sheets of clay (thickest on pasta machine), then trim
to size desired (same for both)
...use a shape cutter to cut out a hole
in one sheet (frame front) --they cut one hole off-center
.......trim
tips off all corners and smooth to round them a bit, if desired
...cut
3 spacer strips of clay, say 1/2" or so wide (2 strips should be the
height of the frame, and 1 the width of the bottom of the frame
less the other 2 strips' widths --it will fit between them)
.......the strips
should be fairly thin in thickness--just a little thicker than the photo
you plan to put in them
...attach the 3 strips to the back of the frame front
(2 sides + bottom, leaving top free) with a bit of liquid clay
(at
this point, add a stand like the wire one below if desired...OR add another
type of stand after baking )
...turn
frame front over (strips down), and place it onto frame back
(which is facing up)
...insert a sheet of cardstock, etc.a bit
taller than the opening (or "two stiff blades"), between frame front
and back to keep them apart and from sticking to each other during baking
(at
this point, could highlight the texturing with a gold powder)
........bake...
after cooling, remove cardstock (or at
this point could highlight texture with gold metallic wax)
wire
stand (fixed in place, angled):
.... bend in half (?), then twist together,
1 ft of wire (for a small-med frame)... bend into heart (or other) shape
.....at bottom area of heart (which will be top of stand), wrap
each excess twisted wire around other one to secure together (bottom of heart
should be rounded, not pointed)
.....on back of the clay frame back, hold joined
area of wire stand in position, then press a ball of clay over it to attach firmly
to frame back
....(op:) add decorative clay over join... texture a small sheet
of same color clay, then use a small-medium cutter to cut out a shape and press
it over the plain clay covering the wire join
lesson
making all clay frame with space inside for photo in clay frame
1.
first bake clay front separately (with the photo glass in
place, if you want to use glass)
2. cut a peice of cardboard the
size of the picture, only taller as a spacer.... wrap it
in tinfoil ...put the foil-encased cardboard on the back of the frame
with the excess sticking out the top
3..put the back of
the frame on, leaving the top bit of cardboard sticking out
of the raw frame (press down edges of backing clay to front clay?)
4.
After baking again, pull the cardboard out leaving a pocket to put the
photo in.
i read in a poly book by
Mary Maguire one way to do this for glass and picture.
...you need a piece of thick cardboard the size & shape of your
picture
...make the "front" first (the frame that will go around the
picture) and make it a little bit bigger all around than your cardboard
...then
lay the cardboard on the back side (helps if you cover the cardboard with foil
first)
...then cover the cardboard 3/4 up with a sheet of clay, trimming
to fit the frame... press down well around the cardboard and bake.
...when
it's cool, just slide the cardboard out, and insert your glass and picture.
To
create a pocket for a picture, I cut a piece of cardstock or posterboard
the same size as the picture...make the clay back piece big enough to cover
the entire size of the frame
....Dust the cardstock with baby powder
...lay it on the back side of the front of the frame in the place where the picture
will be.
....Lay the backing clay over the whole thing ... seal the bottom
edge and the two sides.
....Then just remove the cardboard after the clay
is cured, and cooled and put the picture in. Kim2
I
rolled out [pasta machined] a thick slab of clay, and laid it on a tile
...then
used a template I'd made earlier to cut out the correct outside dimensions
(backing for frame?)
...I rolled out another slab the
same thickness, cut out a frame the same way as before (template had a
hole in it too)
... then picked up that slab and laid it over the first
one
.. I gently pushed the 2 layers together and 'welded' the edges
inside the photo cutout area and around the outside.
...I then worked with
the entire frame [still stuck in place on the tile] until it was rounded and had
no sharp edges.
...I then personlized it with a name..... After baking,
decorate it anyway you want..
...I
glue stiff cardstock [about #110] on the back of the finished frame, and then
glue a hanger on the paper---better to just incorporate the hanger into
the clay backing of the frame?)
hanging, stands...in particular
Here's
what I do for hanging on a wall (especially the heavier)
mirrors and wall pieces
.... fold a piece of telephone wire in half
then twist it until you have a tightly twisted length.
....embed
the ends into a couple of flat pieces of clay, apply liquid clay to
the clay and wire, and press firmly onto the clay back
......be sure you've
turned the ends of the wire so they won't pull out of the clay when
baked. Irene NC
You can make a stand
for your frame from clay, from clay-covered cardboard, or from something else
entirely
...Glenna made a stand and "frame"
to hold a wooden frame... by covering heavy wire(??) with clay
...
the top section also has an open area created by a rectangle of wire
containing a freestanding area of clay flowers and leaves
http://www.rosepetaldesigns.com/images/gallery/frames/callaframe.JPG
(...also
see twisted-wire stand attached at an angle to back of clay frame, above
in polymerclayexpress lesson)
(...also see more stands in Small
Frames below)
other info & ideas
You
could also just make a whole- frame mold ...by pressing
a real frame into some scrap clay, and baking
... then you could making
all kinds of clay frames from that! Deirdre
How
the heck do you get such a wonderfully even and smooth.
frame around them (small items of jewelry?) ? Dotty.
...I usually put
a log of clay through the pasta machine to flatten it some.
...
then lay the piece I'm working on face down on a piece of paper
...
wrap the flattened snake around the outside of the piece
....
laying flat makes the top edge (the one facing you) line up smoothly with the
finished piece
....trim the snake....and then trim off any overlap
there may be above the back of the piece. JAN
Tonja's
small frames using Shapelets, or a handmade stencil or
template (but ok for larger frames + photos)
(lesson) ...for
example, using an template (say, an oval or lozenge shape) you've made
from cardstock or something stiff:
...prepare a clay sheet (A)
to use for the frame (perhaps stamp and powder it, or use a patterned clay
sheet such as mokume gane, ghost image, faux's, caned, collaged, etc..)
.........it's
best to do this on the paper or tile you intend to bake on so nothing moves
around too much
...place the cardstock template on the
clay sheet ...cut around the outside of it, and remove the
resulting inside shape
(to
use for replacing with clay) ...place a clay
sheet (B) you want to use for the framed image or pattern onto
a piece of paper
...place
template on top of this sheet, cut around the template, and this
time remove the resulting outside area
... gently remove this shape
.. and then insert it into same-size opening of the frame sheet; press
together gently
...to complete the frame, cut off
outside edge of frame (following the lines of the inside frame edge, or
create a new shape)
http://www.tonjastreasures.com/journals/tn4.htm
...a
clay rope or other embellishments could be added over the joined
area, if desired
Tonja's
collages of clay items and mixed media, on a backing, hung in
regular frames
http://www.tonjastreasures.com/misc/misc.html
Marie's various frames for photos
http://www.clayfactory.net/marie/gallery3.htm
mandalamama's
various diff. frames for photos
http://www.artwithaheart.com/playwithclay/frames.html
bas
relief dog on frame (Puppy Paws Frame, at joann.com.. made with Model
Magic, but same for polymer clay)
http://tinyurl.com/69dz7
bas
relief cat on frame http://tinyurl.com/5uc8u
Jon
Anderson's framing borders made from canes
http://www.alltherest.com/fimo77.htm
Barbara P's simple tiles in pastel colors placed around frame
(with separating clay bars)... images stamped into clay but not highlighted or
antiqued,etc.
http://pg.photos.yahoo.com/ph/bdbear10/detail?.dir=871d&.dnm=b3bc.jpg
various
frames with tinted liquid clay embellishments
http://www.pbase.com/stargazer/ravensdale_2003
Tonja's mosaic of bamboo leaves ...with
mosaic frame (outlined separately)
http://www.tonjastreasures.com/misc/tn1.htm
Hava's
mosaic frame... also with mosaic background around molded clay
"picture" in frame
http://www.polymerclaycentral.com/chall_jun03.html
nenuphar's
Egyptian theme frames created by adding a fancy crown molding
type onlay at the top and at the bottom only
of a small rectangular sheet
http://isisesc.supelec.fr/gallery-nenuphar/album02
(probably gone)
Dotty's
matchbox pendants with diff. dangles, charm... photo in drawer
when opened (unusual "frame")
http://alookingglass.homestead.com/Dottykaleidoscopes.html
Tonja's
frame made with clay rope formed into rectangle?, inside corners
extra-indented?, then stamped (prob. with texture sheet) and highlighted
with metallic powder (butterfly added after frame)
http://www.tonjastreasures.com/journals/tn8.htm
Marie
S's smaller frame held in a large (post & lentil) portico-like
"stand" consisting of 2 stacks of clay-covered spools/etc.to
form 2 columns with a span (lintel, entablature, frieze?) between
them, and all on a clay base
http://www.clayfactory.net/marie/02-07-03/pages/love2.htm
Julianne's
large 3-D dragon head sculpt protrudes from a wall "frame"
of rocks and moss
http://www.mysticalis.com/galleryall/dragons/dragonotw1/index.html
lesson
on placing transfers on cards, scrapbooks,
etc., surrounded by frames
http://www.michaels.com/art/online/projectsheet?pid=23046
(gone?)
Marina's small round frames
made of twisted straw and ribbons (purchased?), inside which she has placed
sculpted heads/busts. . . one fantasy woman has hair made of dried
moss
***
look now at ---> http://www.marieidraghi.itinglese/epiccolopopolo.htm
where ????
Los Mezitos Chicano Folk Art
frames (brightly colored, graphic)
http://www.animadesigns.com/chincanofolkart/chicanogallery.htm
Well,
I feel I got a lot of great stuff last night while dumpster diving
...behind
a gallery (framing shops too) here that throws out some great scrap
matting... frames... foam board, etc.
... I came home with
some of the frame samples that you see on the framing department's walls.
.......but some of the pieces are just corner pieces (but some
are fancy)... what can I do with those?. Hoda
...........First, I'd suggest
using them for display if you do any jewelry- get a selection of corners,
varied sizes, and spray paint them all gold.
...........Next, get a huge piece
of cardboard (or your mat board!) and cover it with black velvet. Attach the frame
corners randomly to "frame" a piece of jewelry- a necklace snuggled into a
corner piece, a matching pair of earrings nearby, accented with their corner of
a frame- maybe pointing toward each other- enough to point out that they go together,
but purchased separately.
...........Or, paint them all one color (I love
gold!) and build a sculpture that you could either set small objects
on, or drape necklaces over. Making them all the same color helps them
to blend into each other and show off your product, but they add nice texture
and interest at the same time.
........... If you have a booth and use a mirror,
hang some extra frame corners out at the sides, like parentheses, to accent
the mirror. Nancy in VA
On
Decorating Cents one time, the "trash to treasure guy" had a
mirror framed in pieces of moulding.
....none of the
pieces matched though, but it looked great! You could probably check out
the website to see if it had info on it.. Rebecca
I have made a number of small frames for my grandson (snapshot size) for one year, so that my daughter can have a year's worth of photos on the wall at once....I put the names of the months on the frames, and deocrated them to match the month [sept. being school themed, etc.] ...You get to see how much your kids have changed over the course of a year this way.
Small
Frames ....esp. for school photographs or other photos
(freestanding, or could be ornaments, magnets)
For
a simple frame, roll a rope of clay and join the ends into a circle
...form
the rope into the size and shape (oval, square, heart, etc.) of frame you want
...can
then use a texture sheet (or stamps) to press over the whole thing (this
will flatten and widen it...and also hide the joined area).. DB
...lesson
on making a Christmas theme (red & white stripe) frame for a photo
http://www.michaels.com/art/online/projectsheet?pid=99217&categoryid=10
ropes
of decorative clay formed into heart or circle shapes, with purchased
screw-in hanger
http://gallery.gundo.com/gallery/album59/KenDezFrames
(...see
also "Twisted Frames" below for a little fancier version
of this)
Phyllis' frame for a pin (impressed
gold-Pearl-Ex'd, with onlays of leaves and roses in 2 corners)
http://www.expressionartmagazine.com/JFtoc.html
Sarajane's
lesson on making a star (or other) shape frame as an ornament, adding
a hole, then gluing a photo onto the back with a gluestick
...she decorated
with onlays, texturing and a bit of glitter
http://www.sculpey.com/Projects/projects_StarStudent.htm
my
photo ornament frames.
... 3 in upper left were made by covering wooden
drapery rings with cane slices or other decorative clay sheets,
and in some cases adding onlays or metallic powder... stamped date
also added as separate piece in hanger area
http://s96.photobucket.com/albums/l163/DianeBB/Christmas-winter/?action=view¤t=bc46.jpg
.......if
wood is bare, paint
first with acrylic paint or clear acrylic sealer or permanent white glue to seal
and give grip
(see more about covering wood in
Covering > Wood)
lesson on child's hand frame for a photo... a template
of hand is drawn on cardstock or construction paper and placed on clay sheet...
cut around template with a toothpick (or hat pin, etc.)... place photo on from
of plam and surround with rope of clay...(can add macaroni letters to spell name,
or addother embellishements)... bake
...they glue toothpicks on the back of
each finger to make the clay stiffer (but could also reduce the template
size on a copy machine, or place the regular-size hand on another sheet of
clay (a rectangle for example) to make it thicker and stiffer
http://www.diynet.com/diy/cr_clay/article/0,2025,DIY_13750_2268661,00.html
Cecilia's many framed photos for xmas ornaments (onlaid) (website gone)
Becky's lesson on making
baby bottle frames (for frig. magnets) with a bottle-shaped cookie cutter
(& oval cutter for picture)
http://www.hgtv.com/hgtv/cr_clay/article/0,1789,HGTV_3236_2251270,00.html
about
baking the photos in the ornament project---bake away! .....They don't
burn or discolour
....school photos, 35mm prints, glossy or
matte bake just fine...if you watch your temp....we bake at 275 degrees
F.
...
Polaroids are the least good in final results (occassional
blotches )
...can attach photos to raw clay with white glue
or liquid clay on the back (or Sarajane used a gluestick but the
photo also had a frame to help hold it)
...sinilga
coated the photo she used (for a clay cover on a photo album) with liquid clay
on front, as well as back (details in Sheets of
Pattern > Pieced)
http://www.craftster.org/forum/index.php?topic=235709.msg2581183#msg2581183
...I covered the back side of one of a photo with scrap clay,
and framed the sides of the front.
...I make photo frames for special
occassions for special people in my life, and this experiment does indeed
prove you can bake pictures... the process is a lot easier for me with
a much nicer, clean-cut look on the back --where I would have to insert the pictures
otherwise. cowgirls85rule
btw, Polaroid photos should not be trimmed or cut into for 24 hrs... after that, it's okay.
wouldn't it be fun to
use those itty bitty instant "Polaroid" pics from your I-Zone
camera and do the same time of thing, but smaller so it could be used as a
pendant.....or a keychain...." Julie
...or
in a frame or pin?
(for small-medium
frames for mirrors, see above in Mirrors)
(many frames above in Larger Frames could also be created in smaller sizes... so check those out too)
my
lesson:
(two photos on this page show the flattened version of
these):
http://s96.photobucket.com/albums/l163/DianeBB/Christmas-winter
Basic
frame
--chop up at least 3-4 colors of clay..... Roll them together
in a ball, then roll out into a log.
--twist the snake many
times until the stripes are really small and close together, periodically
rolling into a smooth snake to keep all the colors showing.
--drape
into an oval shape (or any other shape) over the photo you want
to frame to determine the length needed for the frame (...the opening should be
a tad larger than you want it to be because flattening will make the opening
smaller).
--cut off the extra snake from both ends, and leave a *straight*
cut on each end.
--butt the ends together ... roll slightly
to join well.
--reshape the frame on a piece of paper or on
waxed paper, making sure the join is at the bottom (or the top --
just wherever you want to decorate).
--Now, you can either leave the clay
frame round, or flatten it by pressing down on it with a flat, transparent
piece of glass or acrylic, or the acrylic sheet from a store-bought frame, etc.
(small round glass discs are sold at Michaels in the autumn/winter to make xmas
ornaments)
......press extra hard anywhere you think the frame is still too
narrow
Decorate the frame anyway you like.
....we made
3 roses to go over the join by pressing a tiny log of clay into a skinny
rectangle, then rolling it up from one end.
....we then made a leaf
for each side of the roses by making a small green ball, then flattening
it a bit into a teardrop shape... indented a line down the length of the
leaf with a toothpick.
Hanger:
--cut an eyepin 3/4"
long, or use a short U shape of wire (metal or plastic-coated
wire) (can also cut off part of a metal or plastic-caoted paperclip)
......if
using a plastic-coated wire, just press straight into top of the frame,
since it will bond with the clay
..... but if using bare metal, zigzag
the end(s) slightly and add liquid clay, white glue or superglue to it before
embedding, then snug clay back around
.........or bake eyepin in clay, then
pull out after baking and cooling and reinsert with superglue
...be careful
not to push the hanger through the inside edge of the frame
--bake
on your piece of paper on top of a cookie sheet, for 20 minutes... let cool.
--add an ornament hook to your top loop
--trim and attach photo to back of
ornament with white glue, or E6000
Back cover (optional):
... a back can completely cover the entire ornament back, or an area
just larger than the opening
...one side can be left open to
insert or change the photo, or the photo can be left in permanently with no
opening
...back could be made with clay, or with felt, leather,
decorative paper, fabric, or anything else --for those, glue on)
.....if
clay, use your baked frame to cut out a same-size sheet, or a smaller one
if desired (in that case, be sure to leave enough room for the photo but not too
much
....can use small strips or sheets of paper between any clay parts
you don't want to fuse during baking (to insert photo)
OR make your frame freestanding by making a small stand for it ...by pressing the baked frame into a flattened log of clay that extends well to the back side. If necessary, add a small log of the same color to the back of the stand next to the frame..... Remove frame carefully & bake stand.
HelenClayArt's
different kind of twisted heart ornament
--two
same-colored ropes twisted in heart shape... large bow hung from middle... leaves
and tiny roses like mine below over the bow area (gone)
VERY SMALL Frames...... for pins & pendants, etc.
MIXED
MANY mixed media frames,
some ornate... many transfers + other tech's used
...pins, collage,
etc
(for
lessons, click
on each picture)
http://www.art-e-zine.co.uk/playwithclay.html
...http://www.art-e-zine.co.uk/pc2.html
...http://www.art-e-zine.co.uk/pcj.html
(wait
for them all to upload) ...http://www.art-e-zine.co.uk/gillclay.html
Marie Segal's framed transfer pins (check
out frames in other galleries too)
http://www.clayfactory.net/marie/gallery1.html
Tonja's
various frames for pendants
... one is an oval frame
(rectangular exterior) onlaid only on a larger background clay layer, and acting
as a "frame" for a decorative sheet of clay (animal skin)
http://www.tonjastreasures.com/jewelry1/jewelry1.html
Debbie Anderson's color and b&w
transfer pins with frames, and some danglies, & other frames
http://www.geocities.com/thousand_canes/
(click on Home Decor & Pins)
Charlene
D's various kinds of frames, framing for pendants
http://home.att.net/~reserved/charlene6.htm
Laura T's tiny frames for faux or other clay
techniques (...these are earrings)
http://www.lauratimmins.com/images/Leaf%20Earrings.jpg
(gone)
Tess' transfer of 1890's? lady in an
oval, gilded frame, with pearls or pearly shapes at
edge of transfer
http://gallery.gundo.com/gallery/album17/cameo_lady_3
Jenny Dowde's transfers with frames, for pendants
http://www4.tpgi.com.au/users/jdesigns/HTML/PolymerClay.htm
Tess'
framed transfers pins:
...with crackled leaf, multicolor granite,
scalloped gold textured or lacey mitered, textured/highlighted)
http://gallery.gundo.com/gallery/album08/new_pins_2
Gerri's many-techniqued,
stamped, transferred, etc., frames
new place for framed things?... try home
page
http://www.newfry.com/frames.html
(scroll down!...also click on all "Frames" pages)
(pg gone)
Gay's
various kinds of frames around stones, etc. http://hobbystage.net/art/zudagay/
(inaccesible)
Susan's
patriotic frames around an eagle transfer (website
gone)
ONLAYS
Xtine's
faux ivory frame, with leafy-flowery onlays, around cane slice of zebra
http://creaplastic.free.fr/14_06.htm
Cheryl's transfers framed with dimensional flowers and dimensional cane
slice leaves
http://www.cherylsart.net/portrait.html
Marcy's
framed pins made around transfers (rub-ons or stickers--could have
been scanned instead)
... using onlays, clay ropes, etc
....some
of her frames have tiny dots here and there, or cane slice embellishments
(on the frame itself, or at one corner)
http://www.marcysclaypen.com/experimental/experimental.html
Tonja's"tin"
pendants made by covering a tiny rectangular
metal tin (with top...like tiny Altoids, etc.)
...a dimensional
onlay "frame" around transfer is created with a textured plain
clay frame around top edge... then onlays on frame are added at top and
bottom or corners only (flower and leaf canes, etc.)
...(cording
runs through upper left & right sides of tin)
http://home.centurytel.net/tkaylen/tinpendants.jpg
MOSTLY METALLIC
*Flo’s
small metallic-effects frames (with transfers)
http://www.picturetrail.com/gallery/view?p=999&gid=297873&uid=155794
many
small metallic effect frames, by Barbara Lang
http://www.barbaralang.com/PolymerClay/collagependants.html
faux metal, framed dog and cat transfer
pendants
http://www.parrishrelics.com/creatures.html
Monica's
"hammered" metal frame... completely covered with gold
(more in Faux-Many > Metals)
http://albums.photo.epson.com/j/ViewPhoto?u=4311023&a=31790690&p=72004864
Monica's
faux metal frame, textured? strip (row of upraised dimples in center, upraised
rope on each side added later?), highlighted with gold (heart shape)
http://albums.photo.epson.com/j/ViewPhoto?u=4311023&a=31790690&p=72004758
Sarajane's
miniature, fancy-framed gold Victorian wall mirror over a dresser
http://www.beadbabe.com/index.asp?where=store&ItemID=21339
Kathy
G's many metallic frames around stamps (website
gone)
MOSTLY "MECHANICAL
HOLDS"
Ed's small frame (for one cane slice).... faux metal,
with a (sculpted?) leaf extending into frame area from each corner to
"hold" the slice
http://edsclaypage.homestead.com/Gallery1.html
(gone)
OTHER THINGS to use as frames
Beckah's
use of a doll house "window frame" (sill and outer
molding parts, forming a dimensional rectangle) ... gilded... around
a transfer
http://www.bearingbeads.com/inspiration5.htm
Cheryl's
framed pin using buna cord ...also pin with red polymer roping (plus
two rubber o-rings) (website gone)
for
much more on the "stacking"
method of framing (to create a background piece which
also functions as a frame)
....see Pendants
& Cording > Stacked Pendants
. . . LOTS of possibilities there
for
templates for cutting transfers into shapes ...or for stacking
together to give the impression of framing
...or for using the same template
to cut transfer and frame-with-matching-hole
(see Cutters-Blades
> Templates)
Troika's
lesson on making pendant frames (from silicone molds)
http://www.pcpolyzine.com/july2001/molds.html
Nanetta's lesson on using Shapelet to cut open frame area in sheet
of mokume gane
http://www.sculpey.com/Projects/projects_AsianTassel.htm
for making a "frame"
created by masking off a blank area for the photo or transfer, then
texturing and highlighting the frame area with metallic powders, see
Mica > Leaf masking
Roll a rope of clay and join the ends . . .
form the rope into the size and shape of frame you want, then use a texture
sheet (or stamps) to press over the whole thing (this will flatten and widen
it . . . and also hide the joined area).. DB
How
the heck do you get such a wonderfully even and smooth frame around
them (small items of jewelry?) ? Dotty.
....rounded strip
......I
usually roll a rope of clay.. .and flatten it in the pasta machine
into a strip.... I then lay the piece I'm working on face down on
a piece of paper..and wrap the flattened snake around it.... that makes the top
edge line up smoothly with the finished piece... trim the snake ...
then trim off any overlap there may be above the back of the piece. JAN
....I
cut a strip of
clay for the frame, then fold it in half... using the (rounded) folded
edge up, wrap around your piece (mine is often a baked piece)...
then smooth the joins. Elizabeth
http://thepolyparrot.com/faux_looks.pdf
(bottom of page)
Alison Ingham uses lots of clay
ropes and shapes as onlay on frames around stones or other focal
items
http://www.tinymicejewellery.com
(see more similar items in Jewelry >
Misc > Renaissance,etc.)
one
idea I have tried for making framings is to use a clay gun with
the die that looks like a 4-leaf clover (or tri-lobe too?)
...after extruding, twist the strand ... it should look
like twisted wires
...then you can wrap this twist around an oval
or circle that you want to use as the base for your setting…Darla
texturing
....Xtine's
round or rounded frames ...most are impressed with just one texture
on entire frame (which surrounds cane slice face)
http://creaplastic.free.fr/14_07.htm
impress
and bevel the frame:
....another easy, but cool thing I do to the
edges of pins or pendants (like leaf impression pins) is
to roll a knurled tool up against the edge.
....I've told enough people about
this to know that some don't know what a "knurled tool" is...
it's any kind of cylindrical tool with that diamond-shaped pattern impressed
into it (somewhere, usually on the handle…say a wrench, for instance).…I use (the
handle of) a leather punch
…so when your pin is just ready to bake, roll
the edge of the tool up against the edge of the pin (lengthwise)....
this puts a little bevel on the edge with an interesting cross-hatch
pattern to boot
...it even squares it up a bit. Mike B.
How
does Mike Buesseler get such a smooth rounded area for his trim around
his lockets?
...I'm happy to share what I can... it's mostly a matter of attaching
a thin, fairly narrow strip around the edge of the locket
(or whatever you want to frame)
........(this technique works esp. well
for metallic clays because the edge showing would be dull colored if you cut
it)
.....I use a simple trick borrowed from sewing, I think..... I use
a rolled "hem" approach.
....as you prepare the edging, running
it through the pasta machine, always fold the piece lengthwise
in half... this means that one edge will have that fold--a rounded look--showing
.... that is the edge that must face out (upward)
....then when you lay the
strip around your piece, make it flush with the face of the piece... then
trim excess off in the back. Mike B.
Donna
Kato's framing lesson
with (sharp-edge) strips....(around
transfer, for a pendant)
...create a flat clay
sheet (thickest setting) to use as a backing sheet ...place on tile...
sit freestanding clay transfer on clay
...cut 4 strips (wider
and longer than you'll need) from another clay sheet (thickest setting) same color
as backing
...using the back sides of the strips (for sharper
edges), place 2 strips on opposite sides of the transfer ...snug up
...to
trim excess lengths, bend blade along
top of transfer with same exact curve
(if you have a curve on your transfer)
...... & cut down through strips
only ...remove ...repeat for bottom strip
...place last 2 strips on
opposite sides ..snug.... rub lightly over seams to erase seams
...trim
all 4 outer sides to widths and curves you want for final piece ...
bake
http://www.hgtv.com/hgtv/cr_clay_jewelry/article/0,1789,HGTV_3238_3073583,00.html
(beg. with
step 11 )
..Donna
Kato's lesson on creating a tall frame around a "Huichol"
pattern (created with seed beads on a layer of polymer clay) for a pin
...(in
this case, she placed the baked shape on a raw backing sheet to
add more thickness and to give the raw frame more raw clay to stick to... then
trimmed excess away after adding frame)
.....cuts frame elements (strips
of 1/2" wide and #1 thickness clay).... applies to one
side of the shape, with the bottom side of the strip upward
(the bottom side has the crispest edge)... cuts off excess strip
(crosswise)... lays a second strip on 2nd side (and repeats for
any number of sides)... smooths joins by stroking surface with a finger
.....also shows her sanding and buffing the frame after baking
http://www.hgtv.com/hgtv/cr_accessories_jewelry/article/0,1789,HGTV_3225_4044790,00.html
(begin with step 7 )
Donna
also inset inset various
metal pieces, etc., inside the depressed pendant "windows" she
made this way
http://web.mac.com/donna_kato/iWeb/Site/Page%202.html
("canoes & kayaks")
...technically,
a bezel may be a small metal case (like a box bottom)
.....but most people seem to use the term bezel
for any metal (or othermaterial) which surrounds a stone,
etc., and can act as a bit of a frame around it. DB
...a
......Rio Grande http://www.riogrande.com
has sterling bezels only, but I think they have base metal c. settings.. obirtasil
...anything
with a framed depression could qualify as a bezel??
http://www.puffinalia.com/bezels/bezels.html
Art Heaven sells bezels, brass and sterling
http://www.artheaven.net/Search.bok?category=Make+Your+Own+Masterpieces
http://www.picturetrail.com/gallery/view?p=999&gid=279317&uid=149408
...after
creating a wire loop (with any other small connector loops she wants), she
...places this on another sheet of clay (back
color, #1), and repeats removal of excess clay
...embellishes the top by pressing
indentions and adding another wire shape, etc.... bakes.... antiques... sands/buffs
http://www.desiredcreations.com/howTo_PJBrassFramePendant.htm
http://www.alijoux.supereva.it/progettimarzo.htm
(gone? ...wrote)
http://bronze.truepath.com/pendants.htm
(gone)
Byrd's onlaid, etc., pendants...
notice "hangers" & bezeled frames
(website gone)
Celadonia's
framed glass pebbles (onlaid leaves, etc.) used as pendants... could easily
have image behind (attached with thin Goop glue) which would magnify it
... many with faux metal frames
http://www.celidonia.it/English/fairies_treasures.htm
(see more on glass pebbles in Misc >
Marbles)
metal bottle caps (the ones from
home brewing supply places which haven't been crimped) can be crushed to
"roll back" the edges and create small round metal "frames"....
(bag of 144 for $2...they have what they call left overs. Donna) ..the plastic
liner inside can be removed by heating with a hair dryer, then lifting one corner
and pulling out...
......miniature pies can also be made in regular
bottle caps (see Miniatures for one website,
and more on pies)
... this is a crushed screw-type
cap: ...pins using bits of found metal to create an artifact look --Urban
Relics (crushed screw-top bottle cap, inset with glow-in-the-dark polmer clay,
beaten metal wire (other items have bone bead stitched on, inlaid ivory, transfers,etc.)
http://ekingdesign.com/art.html
....I use "finish washers" upsidedown to make my miniature tarts
(they look like bundt molds, but flatter with much larger hole --I tried using
grommets first but they're a little narrow and not as sturdy). I got them at the
hardware store (a dollar for 25)... one type is designed to be smashed, the other
isn't. Marie
...any of these could be used just as frames for polymer patterns,
cane slices, etc.
over 3000 brass
charms, including small frames of all shapes (also filigree)
http://www.fancifulsinc.com/default.htm
(click on Catalog Pages, bottom of home page)
.....
esp. pages 5 (hearts), 72,
74, 92-93, 97-99, 101 (bracelets)
Heather
P's lesson on adding a row of
simple cane slices to the edges of the clay (some of these
look pressed into the edge)
... then trims them to only a
thin frame width
http://www.humblebeads.com/tip7.html
Eileen's
nametag pin with cane sheet frame separated from plain central area with
ropes
http://www.mhpcg.org/clayDays/claydays02/sept2002/eileen.JPG
To
get a framed depressed area, try pressing something of the size and shape
you want for your "picture" (transfer, whatever) into a clay
sheet (maybe one that's been textured)
. . . (make sure
the the clay is thick enough for the depth you need
--or back it with more clay)
... any patterned clay sheet should be
able to be treated this way as well
http://www.nanosite.com/confab/c-loupes.html
(only sell completed ones though?)
........(see more on magnifying glasses
in Other Materials > Magnifying Lenses)
(...see
more on framing transfers in Transfers >
Websites)
(...see
more on framing jewelry in Jewelry
> Websites?)
framed Watch Pendants
Tracie framed watch faces... then hung them as pendants... (website gone)
Displays
for Pieces,
or for Swap Items, or other things like photos
For
my swaps... I have a 4'x4' velvet covered cork board going up the back
hall to my room. Any thing that can hang from a pin goes there... and beads get
strung on the strand that frames it. I also got some very nice little shadow
boxes from Michaels... very reasonable with a 40% off coupon. These go up
in my workroom for special inspirational pieces. Things that don't fit in, or
on, either of those... go into two larger curio type cabinets... one in
my living room, one in the upper hall. Joanie
............I like to use my
old photographs in shadow boxes. ... then put in the box anything
that relates to the picture. This could be flowers, baby shoes, old jewelry,
books, etc (made from polymer or not). An example, I took a picture of
my dad where he was at the beach using his metal detector. I included in the box
some of the stuff he found and threw away. There was a bottle top, a child's car,
an old chain, a penny and a fork. szaftoo
(more) WEBSITES
Debbie Anderson's
color and b&w transfer pins with frames, and some danglies, & other
frames,
http://www.geocities.com/thousand_canes/
(click on Home Decor & Pins)
Tonja's many frames around
transfers, etc.
http://www.tonjastreasures.com/transfers/transfers.html
Celie's
transfers framed with Precious Metal Clay
http://www.celiefago.com/gallery_2002_2000.htm
Gerri's many-techniqued,
stamped, transferred, etc., frames
http://www.newfry.com/frames.html
(scroll down! . . . also click on all "Frames" pages)
Marie
S's multiple outlines of cane slices around image (transfer or faux
scrimshaw)
http://www.clayfactory.net/marie/ms50.htm
Kris
Richards' lesson on covering a papier mache frame and onlays using
Jones Tones (and glitter) http://www.sculpey.com/Projects/projects_FoilHeartFrame.htm
frames,pins,collage,
etc. (click on each picture for lesson!)
http://www.art-e-zine.co.uk/playwithclay.ht
Celidonia's
tiny ropes and other bits of clay framing and partly overlaying glass pebbles
and cabochons, for small pendants
http://www.celidonia.it/English/fairies_treasures.htm
Marie
S's framed transfer pins and other pins/pendants
with fancy onlay framing treatments
http://www.clayfactory.net/marie/gallery1.html
(look through all Galleries)
*(Irene Dean's) fatbak’s many-techniqued, tiled, frames & clocks
http://www.good-night-irene.com/index.html
(click on Mirrors and Clocks
and
Wall Pieces, under Older Work)
Singing
Clay's stamped, antiqued, faux leather,"Loping Horses", switchplate,
with thin frame
http://www.singingheart.bigstep.com/item.jhtml?UCIDs=922235%7C1065936&PRID=1024771(click
on Home Decor.Sw'plate)
OTHER FRAMES
*Garie's
small framed bas reliefs & sculpts (small figures and scenes)
http://www.garieinternational.com.sg/clay/frames.htm
http://www.garieinternational.com.sg/art/Chinese_Series/chinese_series.html
(#1)
http://www.garieinternational.com.sg/art/Chinese_Series/chinese_series2.html
(really #3)
Nancy's license plate holder covered with
polymer (and sealed)
http://www.mindspring.com/~randomacts/polyjwlr.htm
Karen
& Ann's lesson on covering the frame for a license plate
with base clay and clay slices (then they add a stamped area)
http://www.hgtv.com/hgtv/crafting/article/0,1789,HGTV_3352_1818365,00.html
Lisa Pavelka's cane slice frame for license plate (and polymer veneers
for parts of her van!)
http://heartinhandstudio.com/news1.htm
Valerie's
high relief plaque scenes (outdoor and figures/structures)
http://www.falczx.com/painting.htm
Caroline's seascape painting with onlaid sailboats and frame of window
curtains (website gone)
PHOTOPOINT
photos & others. . .all now
gone
Mmasaur's transfers with frames
(website gone)
Paulo's faux wood, etc., frames layered, around a color transfer
(website
gone)
Dotty's black-scroll frame around transfer, and others
(website
gone)
*Kim's many framing ideas (around
post. stamps)
(website gone)
*Jenny's many
frames, some onlay
(website gone)
Tanya F's
onlaid sealife frame, cut with pattern scissors around edges
(website
gone)
*mtdew's many unusual frames
(website
gone)
*Kate Andrews' unusual frame with feet used as props (can remove
"picture" and use as pin)
(website gone)
Jan
R's impressed and onlaid small frame, around a stamped/powdered image
(website
gone)
Byrd's "frame" bezels for stones
(website gone)
Cheryl's beaded frames on small items (could do in clay too?) --for
instructions, see Mixing Media/Seed Beads
(website
gone)
Sue's covered cardboard frame with window
(website
gone)
Byrd's
framed Natashas, with spiral canes
(website gone)
catbyte's (Hazel) textured frame, and
other frames, frame for baby
(website gone)
(website gone)
my
twisted frames, xmas frames, etc. (see lesson above)
(website
gone)
Cecilia's
many framed photos for xmas ornaments (onlaid)
(website
gone)
(website gone)
Ginny's
xmas tree frame
http://members.aol.com/ftofclay/minitree.JPEG
(gone?)
*Kimba’s
"Gorkley"-type mirror frames (squiggly onlays)
http://hobbystage.net/art/kimba/gorkley/
(gone)
*Annie's
many caned, onlaid, mixed media, Skinnered frames (and her shaped ones)
http://www.imagestation.com/album/pictures.html?id=4291579771
(unavailable?)
Heather S's covered frames (gone)
http://members.xoom.com/blue_munky/heathers_world_o_fimo.htm
Susan's framed mirror
http://www.geocities.com/EnchantedForest/Cottage/2780/
(Dinko's website!?)
purplepapillon's
frame-and-hanger on mirror made with continuous revolutions of clay rope
onlaid (part of which opens for a hanging loop at the top)
http://www.imagestation.com/album/?id=4292456059
(unavailable?)
Ed's small frames for pendants
http://www.polymerclayhaven.com/treasures/ed.htm
(gone)
SUMMARY:
...tiles
can be created to stand-alone ...or to be grouped next to each other in
a grid or mosaic
...tiles can be flat, or they be somewhat
dimensional with onlays or texturing, etc.
...a base tile or a whole
tile can be made with any technique, as a faux, etc.
...embellishments
for other surfaces could be transfers, onlays (clay, anything),
texturing/stamping/antiquing/highlighting, or decorated in any way
possible
...can be embedded as a mosaic or as a replacement for ordinary
cermic tile(s) ... or glued onto another surface
...can be displayed
in various ways... or can even be functional for repairs
Some Techniques, Appearance
...mica
powders.... metallic leaf.... marbling
....paint
(sponged or painted or patterned)
....texture
or stamp...onlays, etc.
tiles made from translucent
clay mixed with herbs and spices (good use for old spices!)
are some of the coolest I've made. Kim K.
(....for
more on adding in herbs/spices, see Inclusions)
can
also stamp on tiles with Fabrico ink too --bake 15
min to set ...
... for a memo pad made this way, add a small
piece of velcro on the tile -and the other side of the velcro stick on
a black erasable marker (for white boards) and ta da!!! you have a memo
pad to sit beside your phone for messages
.......erases just like the white
board, but the ink where you stamped doesn't come off--it is baked on. vbfll (could
put polymer around edge as frame)
(antiquing) I used
Pthalo blue water-soluble oil paints on my textured tiles
....I
dabbed it all over (a too-bright metallic silver), then rubbed off all the high
areas. What a beautiful "new" tile ...and the oils covered those deep valleys
of the texture better than the acrylics... the metallic did not resist it either.
Jane
many more ideas in Uses & Ideas just below
Uses + Ideas
single tiles
Tiles could can be hung on a wall or door/etc as a decoration or plaque.... or displayed sitting on an acrylic stand or easel... or hung from a "stand"... or used as an onlay on a box, etc ...or used as a coaster or plant "stand"... etc..
Garie's
whimsical bas relief scenes on tiles
http://www.garieinternational.com.sg/clay/tile.htm
Pat
S's sealife and other tiles (mostly flat onlay)
http://home.att.net/~reserved/Sernyk4.htm
flowers in pots,
vines, etc.. as onlays (on a large ceramic tile?)
http://it.dada.net/freeweb/bussola/italyclay/book/foto/marita3.jpg
Jenny D's
round and square "tiles" (multi-layer, collage
type tiles) which hang from an upsidedown sort-of-U-shaped bent metal
rod which is embedded into a wood board... the 2 "hangers"
may be strips of copper
http://www.polymerclay.com.au/Aussie%20Polyclayers%20Members%20Gallery.htm
Caryl's
medium-larger tiles (with onlays) used as plaques
http://www.mhpcg.org/clayDays/claydays02/jul2002/caryl1.jpg
to
create a stand or base for an object, plant, etc.....HGTV
used a large ceramic tile (8x8 or an 12x12)
........then
added drawer pulls to the bottom side for feet (small crystal-look
ones but you could use anything --wooden beads, corks,etc) Lindaa
...could
cover or combine with polymer clay too
...or could be a coaster
(see Sculpting > Other Items for
coasters)
(largest tiles at end)
cover
a purchased tile (ceramic
or terra cotta) --small
or large-- with a thin layer of clay ......generally
backs are not covered
...
then apply cane slices....or sculpt a scene... or otherwise embellish
.....stock
white tiles can be purchased from hardware stores for 10-12¢
each
can apply a transfer to a purchased tile (smooth, tumbled
marble, etc.)
(see info on all these in Transfers...
under Lazertran, or Acrylic Mediums, Liquid Clays, etc.,
depending on the exact method you want to use)
....Donna
Kato's lesson on a photocopy transfer to a gold polymer clay "tile"
(surrounded by checkerboard canes and a log border)... she burnishes the photocopy
onto the clay, then bakes 30 min at 275, cools, then peels paper off tile
http://www.hgtv.com/hgtv/cr_clay_other/article/0,1789,HGTV_3239_1369990,00.html
Irene
D's various rectangular tiles of diff. textures, caned sheets, fauxs, etc.
.to create frames for mirrors,
clocks, & other items
http://www.good-night-irene.com/Mirrors.html
http://www.good-night-irene.com/clocks.html
http://www.gapcguild.com/images/deanphotos/clocks_sm.jpg
????
Larry's
clocks (4" desk clocks & 10" wall clocks with tiles
surrounding like Irene's) ...see his kits below also
http://users.rcn.com/lrubin28/clocks.htm
Teri
S's square clock with square tiles (various techniques) as border
http://www.flickr.com/photos/p__tt/1416977833/in/set-72157602108131287
Arual
Creations' various tiles on frames
http://www.flickr.com/photos/arual_creaciones/839942742
http://www.flickr.com/photos/arual_creaciones/839942734
Teri
S's square clock with square tiles (various techniques) as
border
http://www.flickr.com/photos/p__tt/1416977833/in/set-72157602108131287
Larry's
clocks (4" desk clocks & 10" wall clocks with tiles
of various designs surrounding like Irene's)
http://users.rcn.com/lrubin28/clocks.htm
BRPCG's
logo frame ...various squares of different textures, surface techniques
http://www.brpcg.com/images/guildsign2.jpg
many
sets of tiles ....from class on design exploration by Julia
Sober
http://tinyurl.com/g8y4o
(change to my Photobucket URL)
Sharon
C's small tiles wall hanging (3 columns x 4 rows
= 12 tiles)
...tiles in the 3 columns are held together with large jumprings...
all hang from a crosspiece at top
...tiles have transfers,. onlays,.
texturing,. antiquing
http://www.npcg.org/galleries/progress/images/7.jpg
(gone????)
Cheryl's tiles with
various techniques... copper solder
http://www.pcpolyzine.com/2005winter/artistinterview3.html
on
top of various other items or surfaces (any size tiles):
.....wood boxes or papier mache boxes,.
notebook covers, Altoid tins, switchplates, trays,
tabletops, etc., etc..
.....Violette
put her pattern "tiles" on the side of a large
bookcase
http://creaplastic.free.fr/10vio_10.htm
Suzanne's
recipe card file box covered with "tiles" over a base
cover
http://www.picturetrail.com/gallery/view?p=999&gid=1043624&uid=149408
Tonja's
square box covered with "tiles"..impressed metallic clays with
gold antiquing ( ... no grout?)
http://www.tonjastreasures.com/vessels/tn17.htm
Patti's
not-really-tiles, but inspirational (website gone)
various
tiles
http://www.mhpcg.org/clayDays/claydays04/may2004/images/mosaicLg.jpg
various
lessons and photos of tiles (Cre8it's
or nowwhatzine's)
.... some
mounted on ceramic tiles, etc.
......some
textured or stamped
(mostly
using bulk white Sculpey --some folded
double thickness of #1 pasta machine
for added strength
........then often colored in some way with
their their tinted glazes)
....some are double or triple layers (using a framing paper layer etc..)
...
also notebooks, cards, vessels, even jewelry
http://www.dotcalmvillage.net/nowwhatzineaug02/twotieredtile1.html
http://www.dotcalmvillage.net/cre8it/polyglaze.html
(glazes) .....http://www.dotcalmvillage.net/magazine.html
tiles can be painted on after baking (rather than
building in the color in the traditional way)
....Laurie Mika's patterned tiles
are textured while raw, then painted after baking
......for tabletops...
frames....a "building" for a wall plaque... tops for
boxes, etc
http://www.mikaarts.com/gallery.php
.....http://npcg.org/galleries/progress/progress3.htm
http://www.hgtv.com/hgtv/cr_mosaics/article/0,1789,HGTV_3258_3709285,00.html
(lesson on making box)
could
also use paints or inks to create various kinds of patterning
on clay-covered tiles (clay could also have patterns or texture, etc.)
...
for example, see Letters-Inks (alcohol
inks), and Paints ('faux vinyl")
"tray"
of tiles
....I made a tray of 6 tiles --3 x 2 (each 8") -- separated
by grout
.......the tiles are inlaid into a wide and shallow, wood-board
"tray," (rectangle of plywood, with 4 short strips of wood around the edges
extending upward the same height as the tiles, as a containing outer frame ...when
I added the tile grout, the whole thing was even on the top surface.
........the
thickness of the lines of grout showing and also the wood border
could be varied any way you want
........I made mine with textured regular
ceramic tiles and use this as a hot plate area next to my stove
and microwave (to put hot containers on --you wouldn't
want to use polymer
tiles for contact with hot pans,
etc., though!)
....these could be used as lap trays for
meals, or for messy projects ... or they could go on walls,
etc. Diane B.
...various
techniques used for MDPAG
teeny tiny tiles swap
http://www.mdpag.org/pdfs/swaps/tileswap_1107.pdf
I'm
going to cut some of my tiles up like you would cut fabric for a quilt to make
into pieces for quilt patterns. Kim K.
(...for more, see
Quilt and also Sheets
of Pattern > Pieced)
the
blank backs of dominoes can be used in various ways as "tiles"
--take a look at these, e.g. (not polymer)
http://www.heartsintouch.com/items_embellish.htm
Jessica
A's non-tile wall "plaque" in frame ....
with collaged onlay (face and much more)
http://polymerclaycentral.com/chall_jan04.html
Irene's
small textured tiles ... diff. colors and diff. heights...
combined into 2 vertical strips (of diff. widths)
....used as onlay
on background of wall piece as "framing" (left and right) http://www.npcg.org/galleries/progress/images/13.jpg
(gone?)
Tiles
can be used to fill an empty space anywhere
...or run just a
line of tiles anywhere as a decorative touch
Claudine hides a hole left in the middle of a bathroom tile with a polymer disk (glued on?) which is made from cane slices
backsplash
area... (the area right behind a stovetop might be
a place where the tiles could get a large buildup of grease though and be hard
to clean, or get scratched from
being cleaned with abrasives)
....water splashing shouldn't be
a problem though (unless the moisture is continuously in contact with the
polymer, e.g. from a wet sponge or bar of soap). (see Outdoor
> Water > Sun for info about problems with having polymer
in long-term continuous contact with water).
....one thing to
consider doing in any of these areas would be to mount your tiles
on a backboard of some kind which you could then
attach to the wall.... these could then be mounted or hung anywhere, and
they would have the same visual effect as inlaid tiles.
.......the advantages
of doing that would be that if something happened to the tiles, it wouldn't be
as much work to replace them, and you could also get to them much more
easily to repair or clean
.......not to mention that you could
move them around, or even take them with you if you move (rented apartments
and houses often don't allow permanent changes too.) Diane B.
...I
am currently doing my kitchen backsplash with polymer tiles, but have only replaced
a few of the old "false bricks fronts" so I can see if they will hold
up.
.......the best way I have found to do it is to glue the tiles
on wire mesh with Weldbond... and then cement (thinset)
them on mesh and all... then grout like ceramic tile. Joann
*interesting
sections of tiles in bathroom, kitchen tile sections
http://www.freshfishtiles.com/mosaic.html
(gone)
One
thing to realize though is that you can't use polymer tiles on the floor where
people will be walking.
....They will eventually
chip and could break.
..... If you really want to put some on the floor however,
you could try putting some next to the wall or anyplace else where no one
really puts their feet.
... A couple of possibilities to avoid these problems
could be:
--deeply embedding the polymer parts in-between pieces of
wood or regular tile so the polymer parts wouldn't actually be walked on (though
cleaning might be a problem)
--raising the tiles up so they couldn't
actually be walked on (if making an outer border). Diane B
Or tiles could be used along the baseboards instead of on the floor.... or as crown molding near the ceiling. Kim K.
Lisa
P's polymer clay (mosaic) tiles framing a fireplace
http://www.heartinhandstudio.com/more_clay2.htm
small
old metal tables (for patios, etc.) are great for tiles or
mosaics
...usually the wood on which the original tile/s were
laid will lift out ....it can then be used as a template to cut
a new piece of wood (paint to seal non-tiled areas) to hold the new tiles
panels from tiles which function like wall art .....or a screen
...
finished items would also be handy since they wouldn't be permanent
on walls when renting esp. (....e.g., do them on masonite panels
which you attach to the wall with screws into the studs)
making, baking, attaching tiles
Tiles can be
all clay (.....for larger ones, this might require a fair amount
of clay, but can also be made fairly thin if using a strong brand)
....or
they can have an armature underneath or inside, to save clay...
or to strengthen them... or to make them lighterweight than
ceramic tiles
...... the armature could be something thin, like wire
mesh... or something thicker like illustration
board, thin plywood, masonite, etc.
A
beveled edge can be nice on the edges of the tiles and will make them look
more like regular ceramic tiles, if you want that look
....if using a cutter
or long blade, you can get a beveled edge by placing a sheet of plastic
wrap over the clay before cutting
....... if using a thick armature,
this will also work... cut the clay edge a little beyond where the armature ends
It's
good idea to create your decorative tile right on the surface it
will be attached to whenever possible (which means you wouldn't have to
pick the whole thing up and move it to a suitable baking surface, or otherwise
disturb the finished clay)
...instead, you can
also create it on a (slick) ceramic tile, or something else slick
and flat like a metal baking pan, so that it sticks to that surface
while baking and avoids curling in the oven
.... remove the
tile after baking, then you can attach it to a base of wood or whatever
(using a glue suitable for both surfaces --perhaps Goop), embed it with
tile putty, or use it any other way.
You can bake your tile on something sturdy, already affixed with white glue... Sarajane
Bake it on something really flat, like a sheet of cardstock
....while
still warm from the oven but not burningly hot, glue
it to your acrylic sheet (when you want to attach your tile to a material
which isn't bakable). . .
...hold it in place with something
heavy and flat while it bonds--I use telephone books on top.
......since
the tile is still somewhat flexible while warm, you can make sure there are no
bumps or curls
.....super glue is the best adhesive for plastic-to-plastic
like this, usually.
...I would wait till its totally cooled, then
glaze if you want (I like) Varathane. Sarajane
Whatever you do with them, make sure to bake the tiles as long as possible to create the most strength
Regular ceramic tiles usually have grooves in the back to catch the mortar when embedded . I think that should apply to (large?) polyclay tiles we make as well
You may sometimes also want to put a protective finish (or several coats, glossy or matte) to help protect them (but not nec.). Diane B.
(for possible shrinkage in larger, thinner and also softer clay pieces, see above under General Info)
(for cutting tiles,especially smaller ones, see also Cutters > Small Tiles)
more tiles at GlassAttic
tiles used to make "sheets of pattern" (can be various different pieces puzzle-pieced together)-- see Sheets of Pattern > Pieced
many tiles used in tile bracelets--, see Jewelry > Bracelets > Tiles
tiles
-- and esp. very small tiles-- see
Mosaics
cutting and using clay tile shapes
--see Cutters >
Cutting Small Tiles
Tri-Fold Panels (Triptychs, Icons, etc.)
These could
be small thin tiles or other types of panels (or frames)
(usually three sections, but could be any number --e.g., diptychs, quadraptychs)
which can be hinged, or permanently bent so that they can stand
alone (think of a fireplace screen).
...Originally used for religious icons;
ancient Far Eastern art
...The 3 sections of this type are usually horizontal
but they could also be vertical (though those couldn't stand alone).
...These
could be frames for photos or other artwork or fancy papers/screens, for
example,
or they could be plaques for paintings, transfers, carvings/stampings,
etc., small pendants, faux ivory, or just anything at all.
...The
3 sections could also be parts of one transfer or other image.
Patti
Kimle's tabletop triptychs, unframed (fronts are clay "paintings"...
back sides are faux ivory--impressed with patterns of wheat&grass or
sand&shells) with psalm, poems, quotations
http://www.kimledesigns.com/otherstuff/otherstuff.htm
Diane
Dunville's framed tabletop triptych (moon river onlay/bas relief)
http://www.nwpcg.org/ravensdale/rave/rave00/dunville.shtml
(gone)
Beckah's gilded icon triptychs with transfers,
open and closed http://www.bearingbeads.com/icon%20pictures.htm
(gone)
Tonja's standing Egyptian Art Piece
http://www.tonjastreasures.com/misc/tn25.htm
Dale Doroshow's story-telling
triptych using clay with personal items, papers, beads, charms & small
scrolls of text, & a sewn hinge http://www.nwpcg.org/ravensdale/catalog/doroshow.shtml
(gone)
....and
her various shrines (some composed of three panels joined together)
http://www.dayledoroshow.com/images/41.jpg
....and http://albums.photo.epson.com/j/AlbumIndex?u=1751472&a=32123747&f=
(gone)
wire-frame "shrines"
--"artwork to honor memory making," from Amaco's 2006 3-D Memory Trends
Designer Challenge
http://www.buyamaco.com/october/onlinejudge.html
Dayle's hinged triptychs as "mini-book" pin
http://www.dayledoroshow.com/pics1.htm
(click on Open and Closed)
This
kind of folded panel could also be used as a backdrop for a tiny scene
(or add a "floor" panel to a diptych and have an open "room
box")
What is a triptych?: http://triptych-gallery.com/
hundreds of triptych photos: http://www.google.com/imghp?hl=en,
then enter the word triptych (be sure
to spell it right <g>)
video
by Tory (Victoria) Hughes --Hinges in Polymer Clay--- covers
3 ways to make hinges in pendants (or can use for frames or panels)
1. hinge on the side of a pendant or frame... 2. hinge two parts
of a pendant together.... 3. hinge within a pendant
creating a swinging part
...she mainly uses the "door hinge"
type of hinge, in which a pin of some kind is run through tubes of clay
which are attached to each side (usually two tubes on one side, one on the other
side) ... she creates the hinge tubes in place for an exact fit; these can be
bent or finished with a bead, etc. on each end; she also shows a method of running
a pin/wire through one clay tube (attached to one piece of pendant), then bending
the ends 90 degrees and supergluing into the non-tube piece.
http://www.polkadotcreations.com/books/gp17a.jpg
....
for more info on hinges and types,
see Pendants-Cording
> Hinges & Lockets & pivots hinges ... Books
> Hinges ....Vessels
> Hinges
...for
more inspiration for making triptychs, see at least Books
+ Minibooks ...Vessels ...Frames
...etc.
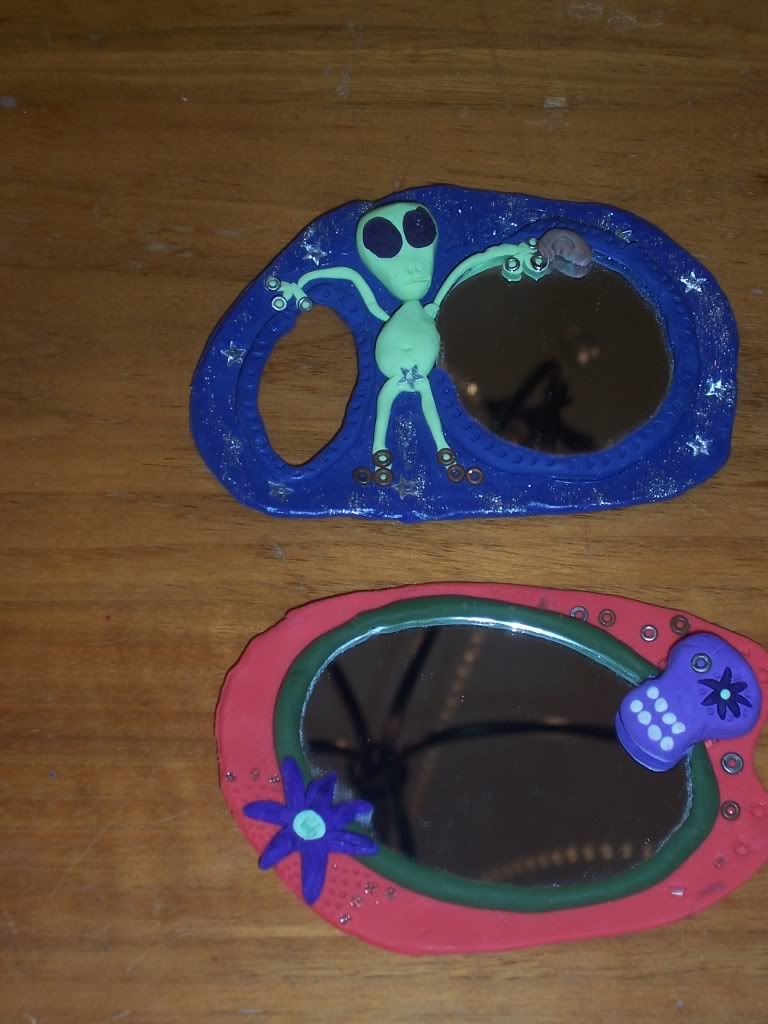
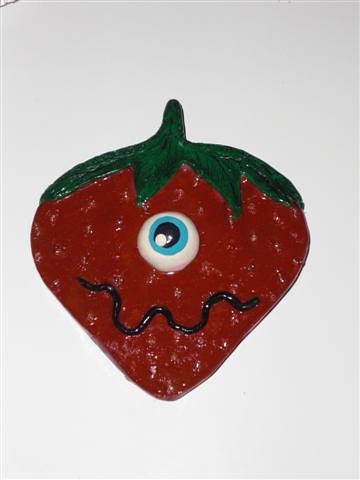
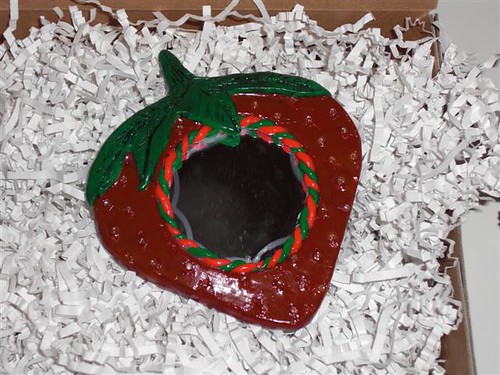
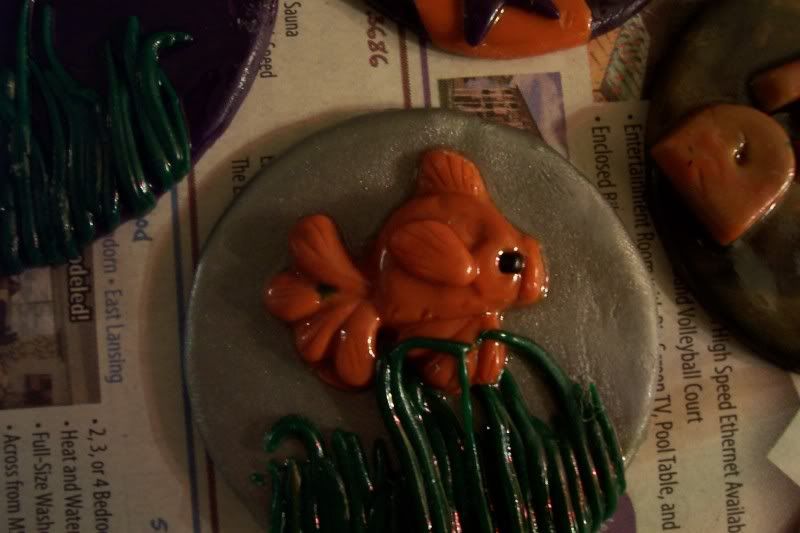
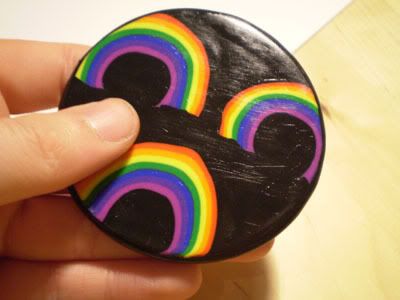
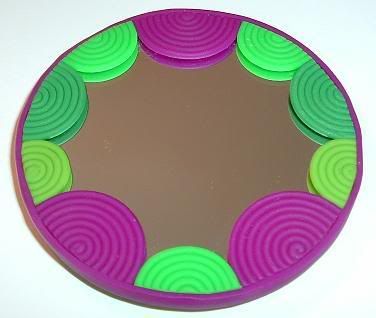
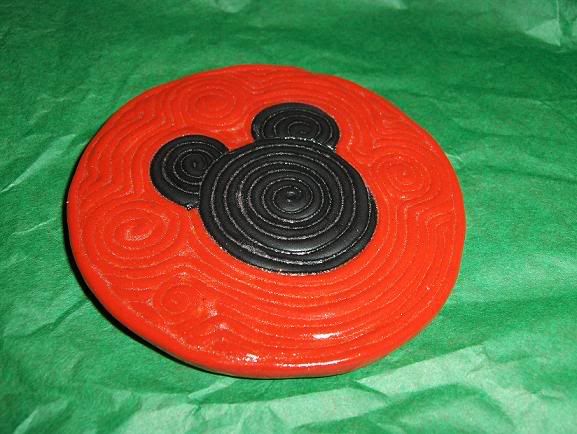
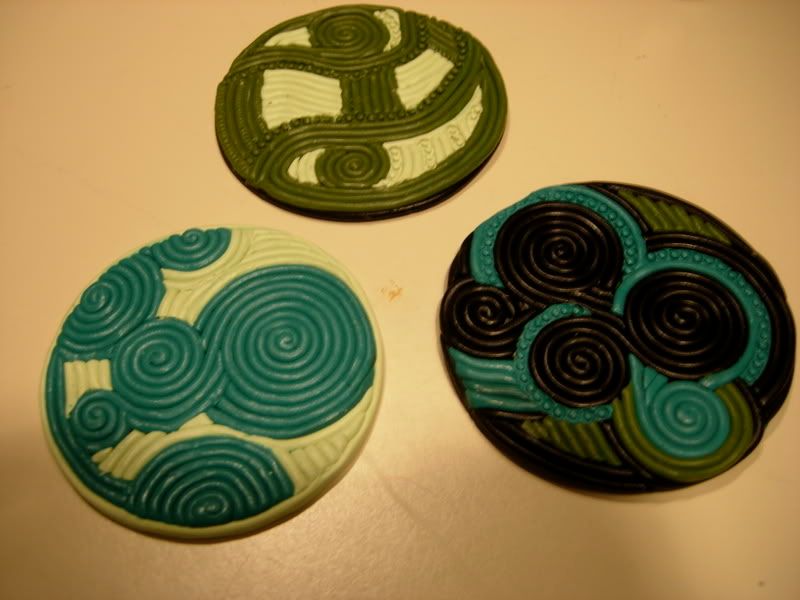